App支付
导入代码
步骤1:启动IDE(如Xcode),把iOS包中的压缩文件中以下文件拷贝到项目文件夹下,并导入到项目工程中。
AlipaySDK.bundle
AlipaySDK.framework
在Build Phases选项卡的Link Binary With Libraries中,增加以下依赖:
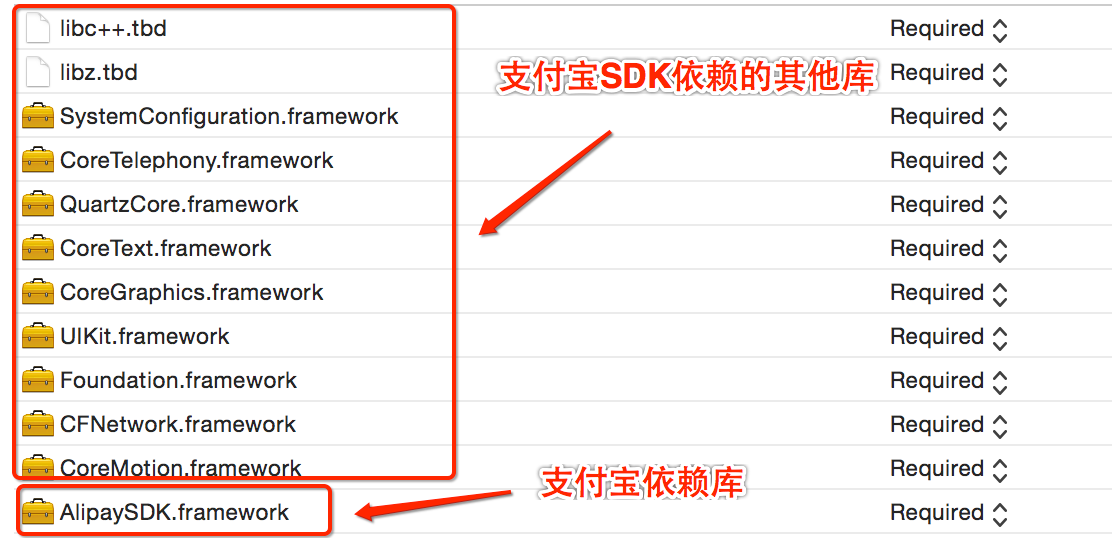
其中,需要注意的是:
- 如果是Xcode 7.0之后的版本,需要添加libc++.tbd、libz.tbd;
- 如果是Xcode 7.0之前的版本,需要添加libc++.dylib、libz.dylib(如下图)。

步骤2:在需要调用AlipaySDK的文件中,增加头文件引用。
#import <AlipaySDK/AlipaySDK.h>
步骤3:组装请求信息。
//将商品信息赋予AlixPayOrder的成员变量
Order* order = [Order new];

// NOTE: app_id设置
order.app_id = appID;

// NOTE: 支付接口名称
order.method = @"alipay.trade.app.pay";

// NOTE: 参数编码格式
order.charset = @"utf-8";

// NOTE: 当前时间点
NSDateFormatter* formatter = [NSDateFormatter new];
[formatter setDateFormat:@"yyyy-MM-dd HH:mm:ss"];
order.timestamp = [formatter stringFromDate:[NSDate date]];

// NOTE: 支付版本
order.version = @"1.0";

// NOTE: sign_type设置
order.sign_type = @"RSA";

// NOTE: 商品数据
order.biz_content = [BizContent new];
order.biz_content.body = @"我是测试数据";
order.biz_content.subject = @"1";
order.biz_content.out_trade_no = [self generateTradeNO]; //订单ID(由商家自行制定)
order.biz_content.timeout_express = @"30m"; //超时时间设置
order.biz_content.total_amount = [NSString stringWithFormat:@"%.2f", 0.01]; //商品价格

//将商品信息拼接成字符串
NSString *orderInfo = [order orderInfoEncoded:NO];
NSString *orderInfoEncoded = [order orderInfoEncoded:YES];
NSLog(@"orderSpec = %@",orderInfo);

// NOTE: 获取私钥并将商户信息签名,外部商户的加签过程请务必放在服务端,防止公私钥数据泄露;
//       需要遵循RSA签名规范,并将签名字符串base64编码和UrlEncode
id<DataSigner> signer = CreateRSADataSigner(privateKey);
NSString *signedString = [signer signString:orderInfo];

// NOTE: 如果加签成功,则继续执行支付
if (signedString != nil) {
    //应用注册scheme,在AliSDKDemo-Info.plist定义URL types
    NSString *appScheme = @"alisdkdemo";

    // NOTE: 将签名成功字符串格式化为订单字符串,请严格按照该格式
    NSString *orderString = [NSString stringWithFormat:@"%@&sign=%@",
                             orderInfoEncoded, signedString];

    // NOTE: 调用支付结果开始支付
    [[AlipaySDK defaultService] payOrder:orderString fromScheme:appScheme callback:^(NSDictionary *resultDic) {
        NSLog(@"reslut = %@",resultDic);
    }];
}
详细可参见Demo中示例文件
- AliSDKDemo\APViewController.h
- AliSDKDemo\APViewController.m
- AliSDKDemo\Order.h
- AliSDKDemo\Order.m
步骤4:配置支付宝客户端返回url处理方法。
(外部存在支付包钱包,支付宝钱包将处理结果通过url返回。)
如示例AliSDKDemo\APAppDelegate.m文件中,增加引用代码:
#import <AlipaySDK/AlipaySDK.h>
在@implementation AppDelegate中以下代码中的NSLog改为实际业务处理代码:
- (BOOL)application:(UIApplication *)application
            openURL:(NSURL *)url
  sourceApplication:(NSString *)sourceApplication
         annotation:(id)annotation {

    if ([url.host isEqualToString:@"safepay"]) {
        //跳转支付宝钱包进行支付,处理支付结果
        [[AlipaySDK defaultService] processOrderWithPaymentResult:url standbyCallback:^(NSDictionary *resultDic) {
            NSLog(@"result = %@",resultDic);
        }];
    }
    return YES;
}

// NOTE: 9.0以后使用新API接口
- (BOOL)application:(UIApplication *)app openURL:(NSURL *)url options:(NSDictionary<NSString*, id> *)options
{
    if ([url.host isEqualToString:@"safepay"]) {
        //跳转支付宝钱包进行支付,处理支付结果
        [[AlipaySDK defaultService] processOrderWithPaymentResult:url standbyCallback:^(NSDictionary *resultDic) {
            NSLog(@"result = %@",resultDic);
        }];
    }
    return YES;
}
针对Demo的运行注意
1、关于签名代码问题
- AliSDKDemo\Util及下面所有文件
- AliSDKDemo\openssl及下面所有文件
- libcrypto.a
- libssl.a
这些文件是为示例签名所在客户端本地使用。实际场景下请商户把私钥保存在服务端,在服务端进行支付请求参数签名。
2、如果遇到运行后报错,类似于以下提示信息:
Cannot find interface declaration for 'NSObject', superclass of 'Base64'
那么需要打开报错了的文件,增加头文件。
#import <Foundation/Foundation.h>
3、如果商户要在某个文件中使用支付宝的开发包类库,需增加引用头文件。
#import <AlipaySDK/AlipaySDK.h>
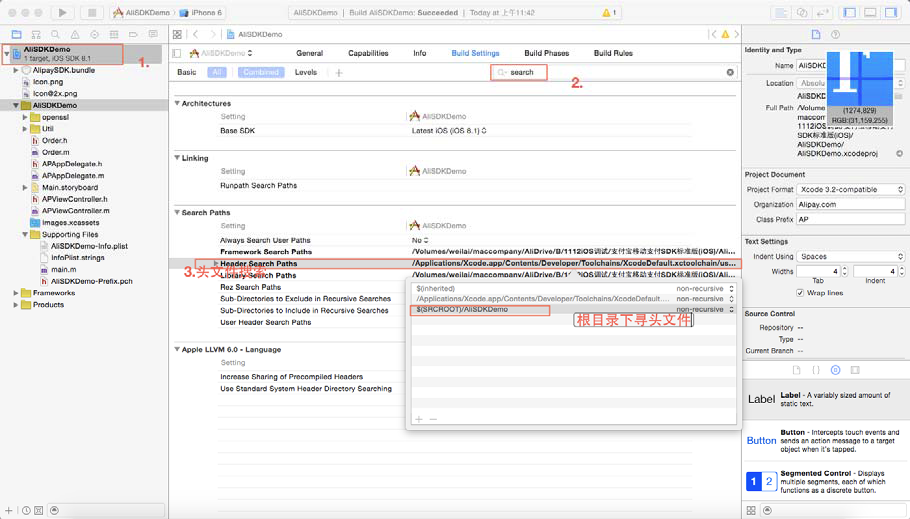
4、点击项目名称,点击“Build Settings”选项卡,在搜索框中,以关键字“search”搜索,对“Header Search Paths”增加头文件路径:$(SRCROOT)/项目名称。如果头文件信息已增加,可不必再增加。
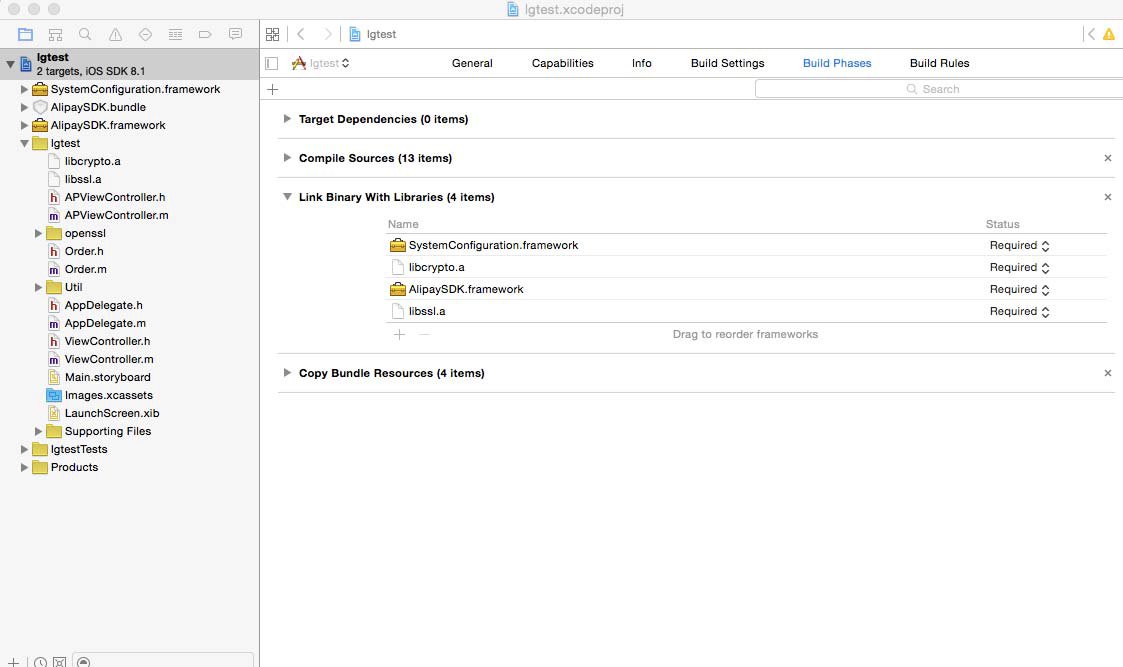
5、点击项目名称,点击“Build Phases”选项卡,在“Link Binary with Librarles”选项中,新增“AlipaySDK.framework”和“SystemConfiguration.framework”两个系统库文件。如果商户项目中已有这两个库文件,可不必再增加。
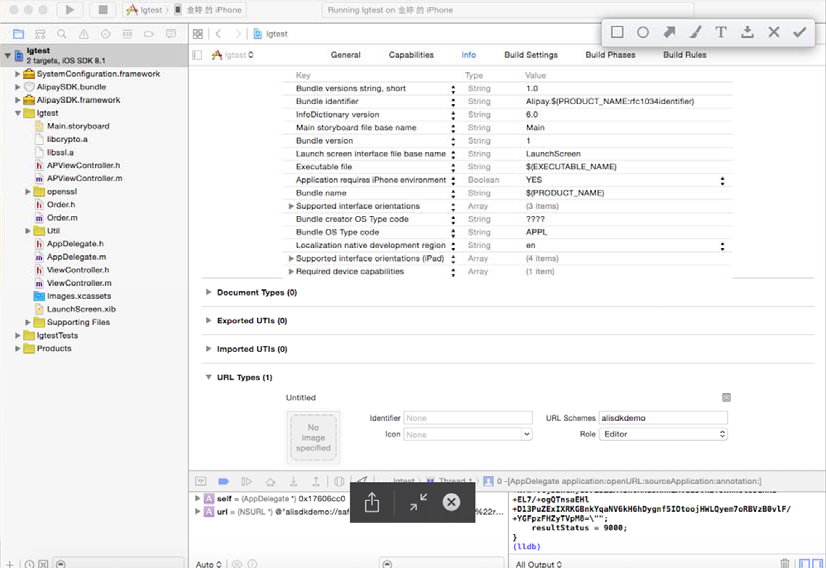
6、点击项目名称,点击“Info”选项卡,在“URL Types”选项中,点击“+”,在“URL Schemes”中输入“alisdkdemo”。“alisdkdemo”来自于文件“APViewController.m”的NSString *appScheme = @“alisdkdemo”;。
注意:这里的URL Schemes中输入的alisdkdemo,为测试demo,实际商户的app中要填写独立的scheme,建议跟商户的app有一定的标示度,要做到和其他的商户app不重复,否则可能会导致支付宝返回的结果无法正确跳回商户app。
配置基本信息
打开“APViewController.m”文件,对以下2个参数进行编辑。
NSString *appid = @"";
NSString *privateKey = @"";
iOS基本信息配置表:
| 参数 | 含义 |
|---|---|
| appid | 应用ID,调用API时用来识别开发者。请参考创建应用并获取APPID。 |
| private_key | 应用私钥,pkcs8格式。请参考配置密钥。 |
注意:这些参数配置仅作为客户端示例使用。商户实际支付过程中参数需要放置在服务端,且整个签名过程必须在服务端进行
代码示例运行逻辑
步骤1:调用order.m里的函数description将商品信息拼接成字符串作为待签名字符串,如:
app_id=2015052600090779&biz_content={"timeout_express":"30m","seller_id":"","product_code":"QUICK_MSECURITY_PAY","total_amount":"0.02","subject":"1","body":"我是测试数据","out_trade_no":"ZQLM3O56MJD4SK3"}&charset=utf-8&method=alipay.trade.app.pay&sign_type=RSA2×tamp=2016-07-28 20:36:11&version=1.0
步骤2:使用类CreateRSADataSigner,调用signString签名函数做签名,如:
"GsSZgPloF1vn52XAItRAldwQAbzIgkDyByCxMfTZG%2FMapRoyrNIJo4U1LUGjHp6gdBZ7U8jA1kljLPqkeGv8MZigd3kH25V0UK3Jc3C94Ngxm5S%2Fz5QsNr6wnqNY9sx%2Bw6DqNdEQnnks7PKvvU0zgsynip50lAhJmflmfHvp%2Bgk%3D"
步骤3:把签名结果赋值给参数sign,并把sign加入之前的待签名数组中,此时得到的便是要请求给支付宝的全部数据。
app_id=2015052600090779&biz_content={"timeout_express":"30m","seller_id":"","product_code":"QUICK_MSECURITY_PAY","total_amount":"0.02","subject":"1","body":"我是测试数据","out_trade_no":"ZQLM3O56MJD4SK3"}&charset=utf-8&method=alipay.trade.app.pay&sign_type=RSA2×tamp=2016-07-28 20:36:11&version=1.0&sign=*********
步骤4:调用(AlipaySDK *)defaultService类下面的支付接口函数,唤起支付宝支付页面。
(void)payOrder:(NSString *)orderStr
  fromScheme:(NSString *)schemeStr
    callback:(CompletionBlock)completionBlock
appScheme为app在info.plist注册的scheme。
步骤5:当这笔交易被买家支付成功后支付宝收银台上显示该笔交易成功,并提示用户“返回”。此时在APAppDelegate.m的 - (BOOL)application:(UIApplication )application openURL:(NSURL )url sourceApplication:(NSString *)sourceApplication annotation:(id)annotation 中调用获取返回数据的代码【iOS9.0以上(包括iOS9.0)需要在 - (BOOL)application:(UIApplication *)app openURL:(NSURL )url options:(NSDictionary<NSString, id> *)options 中执行 】:
[[AlipaySDK defaultService]
processOrderWithPaymentResult:url
standbyCallback:^(NSDictionary *resultDic) {
NSLog(@"result = %@",resultDic);//返回的支付结果
}];
注意:
1.同步返回数据校验逻辑请参考……
2.SDK付款有两种模式:如果外部存在支付宝钱包,则直接跳转到支付宝钱包付款;不存在的场景下,在SDK内部进行H5支付。测试同学需要关注这两类测试场景。
针对Swift接入AlipaySDK的问题
如果项目使用Swift为开发语言,需要添加桥接文件,如Bridging-Header.h
同时,在项目Build Settings中设置桥接文件的位置
添加成功后,在桥接文件中写入#import <AlipaySDK/AlipaySDK.h>
如此,在需要调用AlipaySDK的地方,即可直接使用,具体调用方式参照OC。


注意,运行时如果发生如下报错
在桥接文件中,写入#import <UIKit/UIKit.h>

